PRECISE-LOG data loggers support the Modbus TCP protocol, allowing a Modbus TCP client/master to read supported Input Registers and Holding Registers from the data logger over a network connection.
The Modbus register definitions for each PRECISE-LOG model can be found on the corresponding product page.
Follow the steps below to enable Modbus TCP using SiteView.
1. Connect the Data Logger to the Computer
Connect the PRECISE-LOG data logger to a USB port on your computer.
Open SiteView.
Under the USB Comm panel, double-click the data logger icon.
2. Open the Logger Configuration
In the logger’s Status window, click:
Configuration
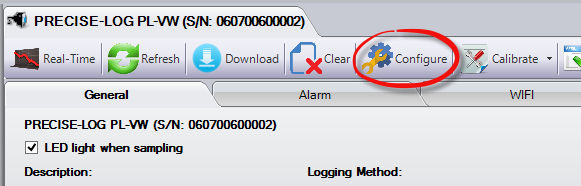
3. Enable Modbus TCP
In the Configuration dialog, select the:
WiFi Settings
tab.
Check:
Use Modbus Protocol

By default, Modbus TCP uses:
TCP Port 502
If your Modbus TCP client/master is configured to use a different port, you can change the Port setting accordingly.
4. Select the WiFi Mode
Depending on your application, select one of the following WiFi modes:
- Standard Server Mode
- AccessPoint Server Mode
Make sure the WiFi settings are configured correctly for the network you intend to use.
5. Save the WiFi Settings
Click:
Save WiFi Settings
The logger’s LED will begin blinking while it establishes the WiFi connection.
Once the network connection is established, the PRECISE-LOG data logger will operate as a Modbus TCP server.
A Modbus TCP client/master can then connect to the logger using its IP address and configured Modbus TCP port.
Modbus Register Information
For details about the available Input Registers and Holding Registers, refer to the Modbus register information provided on the corresponding PRECISE-LOG product page.
For instructions on configuring the WiFi connection, refer to:
How to Configure WiFi Settings for a PRECISE-LOG Data Logger