Option 1: Access the Data Logger Through a Port Forwarding
If you have a PRECISE-LOG WiFi data logger, or a data logger connected to a Site USB Device Server(Smart-Hub), you can communicate with it using SiteView when your computer is connected to the same local network.
If you need to access the data logger from outside the local network, you can configure the network router to forward the required TCP port to the logger or Site USB Device Server.
The following example explains the setup.
1. Example Network Configuration
For this example, assume the following:
- Public IP address or domain name of the remote network:
123.456.789.123 - Local IP address of the PRECISE-LOG WiFi logger or Site USB Device Server:
192.168.1.100 - TCP communication port:
5678 - Computer B: A computer located outside the remote network with SiteView installed
The PRECISE-LOG WiFi logger or Site USB Device Server must already be connected to the local network and accessible within that network.
2. Configure Port Forwarding on the Router
Ask your IT administrator to log in to the router or firewall for the remote network and create a TCP port-forwarding rule.
Using the example above, configure the router to:
Forward incoming TCP traffic on port 5678 to:
192.168.1.100 : 5678
This allows an external SiteView connection to reach the PRECISE-LOG WiFi logger or Site USB Device Server through the network’s public IP address or domain name.
Note: The required port must also be allowed through the network firewall. Router and firewall settings vary by network, so assistance from your IT administrator may be required.
3. Add the Remote Connection in SiteView
On Computer B, which is located outside the remote network:
- Open SiteView.
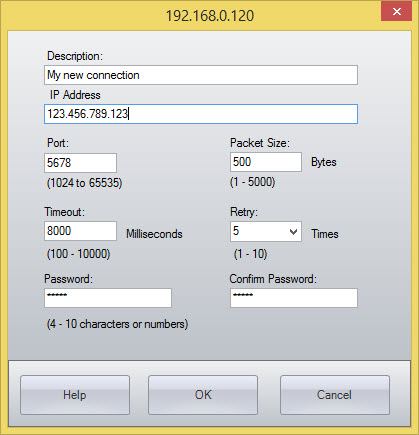
- Under the USB Server panel, add a new connection.
- Enter the remote network’s public IP address or domain name.
- Enter the TCP port configured for the logger or Site USB Device Server.
For this example:
- Address:
123.456.789.123 - Port:
5678
4. Connect to the Remote Data Logger
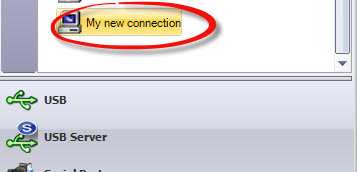
After the new connection appears in SiteView, double-click the connection.
SiteView will communicate with the remote PRECISE-LOG WiFi logger or the data logger connected to the Site USB Device Server.
Security Considerations
Port forwarding makes the selected network service accessible from outside the local network. The configuration should therefore be performed or approved by your IT administrator and protected using appropriate firewall and network security policies.
Option 2: Access the Data Logger Through a VPN
A VPN can also be used to communicate with a PRECISE-LOG WiFi data logger or a data logger connected to a Site USB Device Server from outside the local network.
Compared with direct port forwarding, a VPN allows the remote computer to securely join the same private network as the data logger. Once the VPN connection is established, SiteView can communicate with the logger using its local IP address.
Example Network Configuration
Assume the following configuration:
- Remote site local network:
192.168.1.0/24 - PRECISE-LOG WiFi logger or Site USB Device Server IP address:
192.168.1.100 - VPN server/router: Installed at the remote site
- Computer B: Located outside the remote site and running SiteView
The network configuration can be illustrated as:
Computer B
↓
Internet
↓
VPN Connection
↓
Remote Router / VPN Server
↓
Remote Local Network 192.168.1.x
↓
Data Logger / Site USB Device Server
192.168.1.100
1. Configure the VPN Server
Configure the router or firewall at the remote site to provide VPN access.
Many business routers and firewalls support VPN protocols such as:
- WireGuard
- OpenVPN
- IPsec
- SSL VPN
The exact VPN configuration depends on the router or firewall being used.
The VPN should be configured so that a remote VPN client can access devices on the remote LAN, including:
192.168.1.100
For example, after Computer B connects to the VPN, it may receive a VPN address such as:
10.8.0.10
The VPN server must provide routing between the VPN network and the remote LAN:
10.8.0.x → 192.168.1.x
Your IT administrator should also make sure that the firewall allows VPN clients to communicate with the data logger or Site USB Device Server.
2. Connect Computer B to the VPN
On Computer B, install or configure the VPN client provided by your router or IT administrator.
Connect to the remote site’s VPN.
After the VPN connection has been established, Computer B should be able to reach devices on the remote local network.
For example, Computer B should be able to access:
192.168.1.100
even though Computer B is physically located outside the remote network.
3. Add the Connection in SiteView
Open SiteView on Computer B.
Under the USB Server panel, click Add New Connection.
Enter the local IP address of the PRECISE-LOG WiFi logger or Site USB Device Server:
192.168.1.100
Click OK to create the connection.
4. Connect to the Data Logger
Double-click the newly created connection.
SiteView will communicate with the PRECISE-LOG WiFi logger or the data logger connected to the Site USB Device Server through the VPN.
The data logger can now be accessed in SiteView in the same way as if Computer B were connected directly to the remote site’s local network.
Important Difference Between VPN and Port Forwarding
With port forwarding, SiteView connects to the remote site’s public IP address or domain name, and the router forwards the communication to the data logger.
For example:
123.456.789.123 → 192.168.1.100
With a VPN, Computer B first joins the remote private network. SiteView therefore connects directly to the logger’s local IP address:
192.168.1.100
No TCP port for the data logger needs to be exposed directly to the Internet.
For networks where VPN access is available, this is generally the preferred method because the data logger remains inside the private network and remote access is controlled by the VPN.