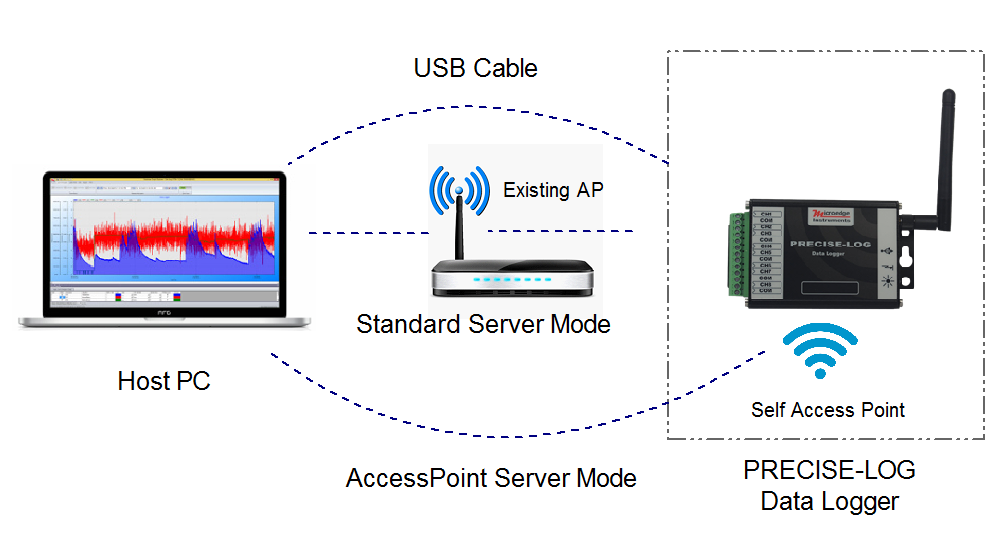
There are two WIFI modes the data logger can work in:
Standard Server Mode:
In this mode, both data logger and your host PC can join an existing WIFI network (Access Point). This is the mode most customers use and there is no physical distance limit between the data logger and the host computer.
To configure the data logger to work in Standard Server mode:
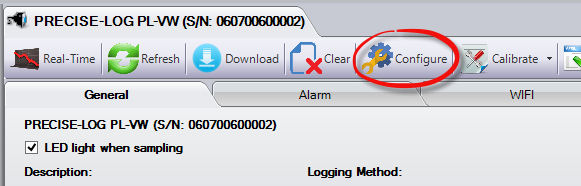
- On the logger status’s tool bar, click ‘Configure’ button to show the configuration dialog.
2. Click Wifi Settings tab and select ‘Standard Server Mode’ option. Edit ‘Wifi Access Point’ section where SSID is the access point the data logger will join.
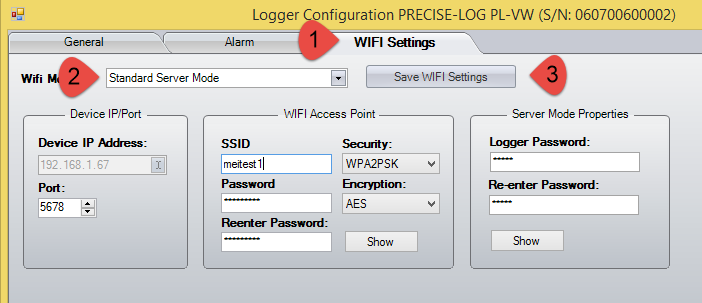
3. Click ‘Save WIFI Settings’ button to save the new settings to the data logger. The LED on the data logger will start blinking while joining the access point. Once joined the LED will stop blinking.
4. Click ‘WIFI’ tab from the logger’s status window and click ‘Refresh’ button.
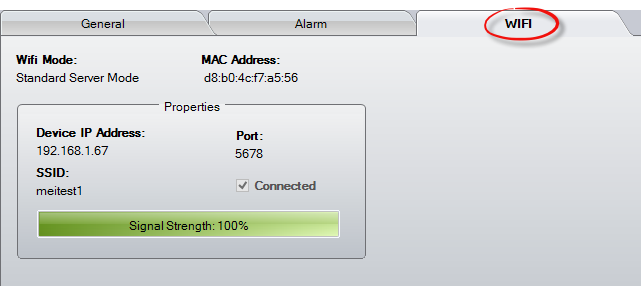
Notice the data logger has joined the WIFI access point ‘meitest1’ and the WIFI network’s DHCP server has assigned an IP address ‘192.168.1.67’ to the data logger. If this ‘Device IP Address’ does not show, please wait for one minute or two and click ‘Refresh’ button again. The reason is DHCP server might need some time to assign the IP address and the data logger will periodically get this IP if it has not retrieved one.
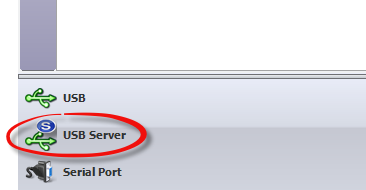
5. Click ‘USB Server’ on the Comm panel.
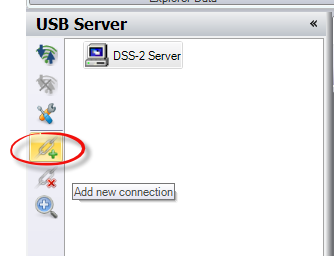
6. Click ‘Add new connection’ icon.
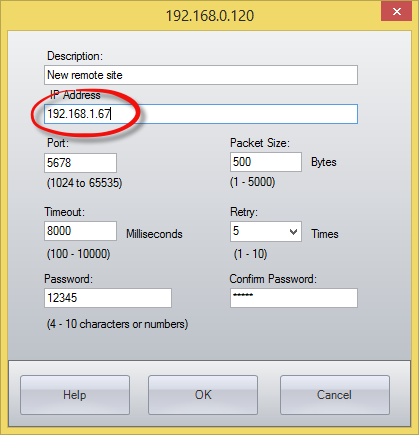
7. In the pop-up dialog, change the IP address filed with the ‘Device IP Address’ you set in the data logger’s status window. And click ‘OK’ button to create a new connection.
8. Double click this new connection to contact the data logger. The data logger icon should show under the new created connection. Double click the data logger icon to show the status window of this data logger.
![]()
Congratulations! You have changed the logger’s setting and made the connection with the logger via Standard Server mode.
AccessPoint Server Mode:
In certain situations where the field is remote or does not have an existing WIFI network, the Standard Server mode will not work. In this case you can use ‘AccessPoint Server’ mode to make an easy remote point-to-point communication with the data logger.
In this mode, the data logger will create a WIFI Access Point(AP), then a host PC can join this network and start to communicate with the data logger.
To use this new feature, please download the new version of SiteView software (version 4.1.3) and upgrade PRECISE-LOG with new firmware version 2.04.
- On the logger status’s tool bar, click ‘Configure’ button to show the configuration dialog.
2. Click WIFI Settings tab and select ‘AccessPoint Server Mode’ option. Edit ‘WIFI Access Point’ section where AP SSID is the access point the data logger created for a host PC to join.
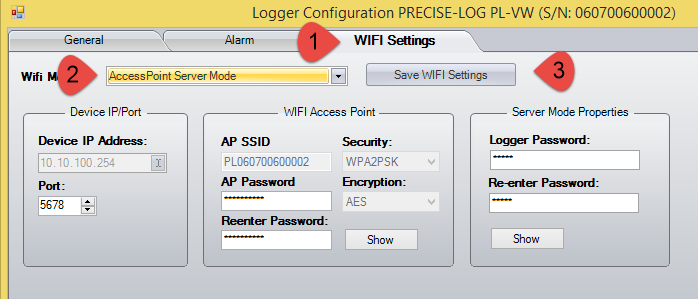
Note that the ‘AP SSID’ is read only and your host PC needs to connect to this access point. The login password is the one you set below ‘AP SSID’ field. You will need it when you join the access point.
The logger’s IP address is fixed to ‘10.10.100.254’
Click ‘Save WIFI Settings’ button to save the new settings to the data logger.
It may take up to a minute for the access point to be discovered by your computer. If it never shows, you may need to unplug the data logger from the computer and plug it back in again.
3. From the host computer, open the WIFI network list to look for an access point named ‘PL’ + ‘Serial Number of the logger’
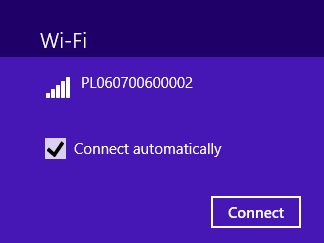
Click the access point and choose ‘Connect’. Type in the password you set in ‘AP Password field’ in the previous step. Wait until you have joined the network.
4. Click ‘USB Server’ on the Comm panel.
5. Click ‘Add new connection’ icon.
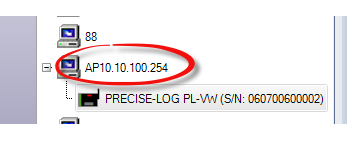
6. In the pop-up dialog, fill in the IP address field with ‘10.10.100.254’ and give a name to this connection. Then click OK button to create the connection.
7. Double click this newly connection to contact to the data logger. The data logger icon should show under the newly created connection. Double click the data logger icon to show the status window of this data logger.
Congratulations! You have changed the logger’s setting and made the connection with the logger via AccessPoint Server mode.